Send a photo from your CCFC Field Camera to your Campbell Scientific Datalogger
by Alexia Ferrari | Updated: 08/16/2016 | Comments: 0
Blog Topics
Area / Application


Product Category


Corporate / News
Search the Blog
Blog Languages
Subscribe to the Blog
Get an email when a new article is posted. Choose the topics that interest you most.
Suggest an Article
Is there a topic you would like to learn more about? Let us know.
Why is this important?
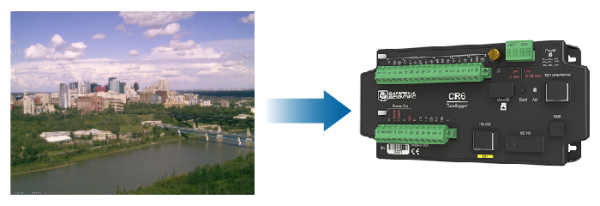
Although the CCFC Field Camera can act alone and connect to telemetry and transmit images in many forms, if a datalogger is at the same location, you save the cost of having two telemetry connections, one for the logger and one for the camera! If you need the images on a regular basis and the datalogger already has a telemetry connection (e.g. cell, satellite modem, land line etc.) , you won’t need to purchase a second unit for the camera. Simply send the images from the CCFC to the datalogger (must be a PakBus logger) and setup LoggerNet to retrieve data and images. As the CCFC was designed for remote outdoor observation applications, it is easy to imagine several scenarios where remote photo retrieval is desired.
The CCFC is completely configurable with its easy to use user interface (UI). Through the UI, you can configure your camera to send photos to the datalogger. Your datalogger will also need to be configured to receive these photos from the camera.
Before you get started, please note that this operation works on all pakbus Campbell Scientific dataloggers such as the CR800/850, CR1000, CR3000, CR6, and CR300.
Watch the video
Set your CCFC to send photos to your datalogger
First, power up your camera and connect to the CCFC's UI.
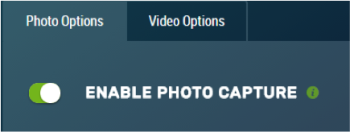 In the CCFC’s UI, ensure a capture mode is selected (ex. Timed Capture), a title is entered, and a schedule for photo capture and lens position are selected. Once ENABLE PHOTO CAPTURE is enabled then enable the SEND VIA PAKBUS toggle.
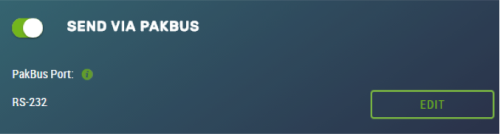
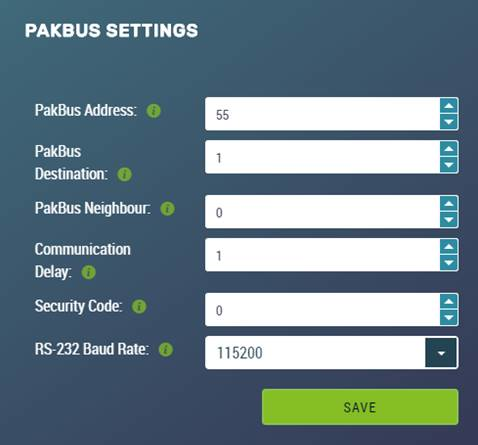
PakBus port must be RS-232. To verify PakBus Port inputs, click EDIT. A popup window will display: PakBus address, PakBus Destination (PakBus address of the datalogger), PakBus Neighbourhood (if no neighbours, zero), Connection Delay (if directly connected to the camera, not required, if you’re using a wireless radio connection, may be required), Security Code (only required if your logger has security set up), Baud Rate (highest possible). Once PakBus is verified, SAVE! Now that the CCFC’s UI is set up to send photos to the datalogger, the datalogger must be set up to receive these photos.
Set the datalogger to receive photos from the camera
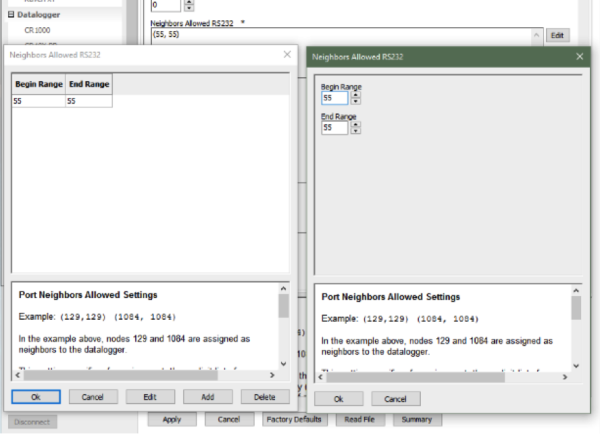
In Device Configuration Utility, Campbell Scientific’s datalogger free support software, connect to the datalogger. All setup can be completed in the Settings Editor tab. Begin by verifying the PakBus Address for the datalogger. The address shown in this spot must be the same as what was set in the CCFC. Next, in the ComPorts Settings Tab, choose the RS-232 Baud Rate and ensure it is the same as what was selected in the camera and input the Neighbours Allowed, which is the PakBus Address of the camera (can be verified in the UI), and click OK.
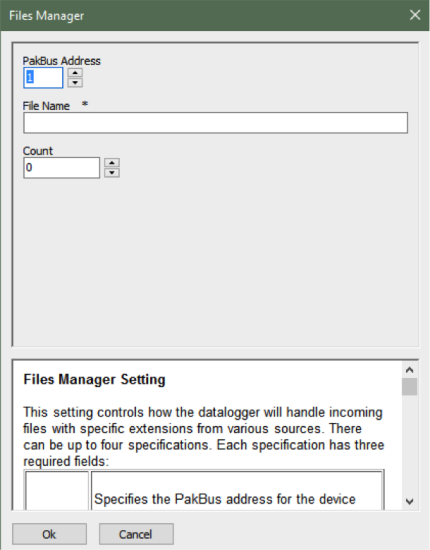
In the Advanced Tab, set IS Router to True and set USR: Drive Size to hold as many photos as you like. Note that the USR: Drive size is in bytes so if you want to be able to save three 50kb images you will need to set your USR: Drive size to 150000. You need to know your approximate photo size (from the CCFC) and how many photos you want to save. It is imperative to set the Files Manager, as files will be sent to the datalogger every time a photo is taken by the CCFC. If the USR drive is not set, the memory will fill up and stop collecting photos. By setting the Files Manager, the datalogger will overwrite photos to capture and retain as many as you want.
Test to make sure the photo is being captured and the camera and datalogger are communicating
In the CCFC’s Capture Mode, at the bottom center of the screen, select TEST CAPTURE.

In LoggerNet, PC400, or PC200W, connect the device and select File Control where you should see your datalogger. If your datalogger is not visible in the left hand pane, refresh the screen. The file should be visible on the right hand side of the panel. To view the image, right click and select View File.
Setup LoggerNet to automatically retrieve photos from your datalogger
Note, a LoggerNet license will be required for this next step. In order to avoid losing photos, set up LoggerNet to retrieve the photos from your datalogger at timed intervals. Remember that you set up your datalogger to store a maximum number of photos on your datalogger. If these photos are not retrieved in time, they will be overwritten by new ones. To be clear, the oldest photos are overwritten first. In the LoggerNet setup window, select the desired station from left hand pane. In the Hardware Tab, make sure Communications Enabled is selected. In the Schedule Tab, set schedule frequency for image retrieval. In other words, how often you want your computer to be calling your datalogger. The frequency you enter here must be less than the total time interval of photo collection. If you set your CCFC to capture three photos at 15 minute intervals and you set your logger to save 3 images the schedule frequency must be set to less than 45 minutes. In the File Retrieval Tab, click to enable Retrieval Enabled and be sure that Follow Scheduled Data Collection (just set in the Schedule Tab) is selected. Next, be sure to click on Delete Files After Retrieval (acts as a backup to ensure files are deleted appropriately). Lastly, in File Patterns, Add New, Edit File Pattern (drop down), select the file you set up in the UI. You must click APPLY. LoggerNet is now setup to automatically retrieve your images from the datalogger.


About the Author
 Alexia Ferrari is a technical writing consultant for Campbell Scientific Canada (CSC). She assists with writing manuals, technical documents, and industry articles. Alexia is the published author of On Fracking, and her work has also appeared in Alberta Oil magazine, Meteorological Technology International magazine, and the Global Chorus anthology.
Comments
Please log in or register to comment.