Power Up and Connect to the CCFC Camera UI via Wi-Fi
by Raina Mithrush | Updated: 07/26/2016 | Comments: 0
Blog Topics
Area / Application


Product Category


Corporate / News
Search the Blog
Blog Languages
Subscribe to the Blog
Get an email when a new article is posted. Choose the topics that interest you most.
Suggest an Article
Is there a topic you would like to learn more about? Let us know.
CCFC Field Camera How-To: Power Up and Connect to the User Interface via Wi-Fi
Now you’ve got your camera, what’s next? This video explains how to connect your power cable to battery, power up your camera, and connect to the user interface over Wi-Fi connection. The user interface is where you go to configure the camera however you like; you can change capture settings, retrieval modes, and much more.
Step 1: Connecting the power cable
Your CCFC Field Camera comes with a Power and I/O cable. To connect this to the camera, remove the red cap at the back of the camera and insert the cable into the back of the camera by twisting the large connector end of the cable until it fits in the grooves on the camera’s plug in. Once you feel/hear the click of the grooves lining up, twist the tip of the cable to lock it in place. The cable should feel snuggly connected to the camera.
Next, take the wired end of the camera cable and connect it to a power supply. We're using the Campbell Scientific PS150 Power Supply but other 12VDC power supplies or even the 12V channel on a datalogger can be used. Connect the black wire to ground (G), the white (or shield) wire to ground (G), and the red wire to 12V. Turn on the battery.
Step 2: Connect to the camera’s user interface via the camera’s built-in Wi-Fi
Once you connect power to the camera, a solid green LED light on the back of the camera will light up. Wait about 90 seconds and the light will to slowly flash. This means the camera’s Wi-Fi is now discoverable and ready to be paired with your laptop or device.
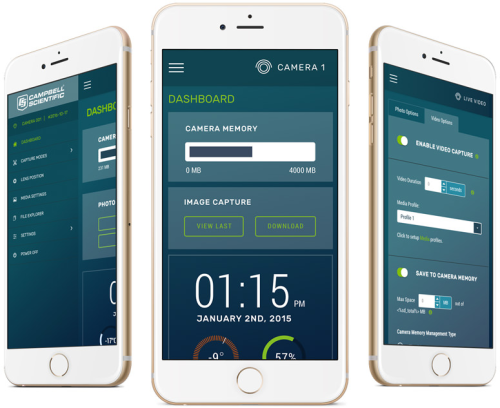
Now go to your computer, smartphone, or tablet and search for the camera’s Wi-Fi network. Refer to your device’s manual if you need help to discover available Wi-Fi networks on your device. You should see CCFC and the last 4 digits of your camera’s serial number. Select the camera’s Wi-Fi network to connect. Then open a browser such as Chrome or IE and enter the IP address 10.0.0.1 in the url address bar. This will bring up the camera’s user interface.

Next Steps:
Now that you’re connected to the camera’s user interface, you can begin configuring the camera to your specifications. If it’s your first time using the camera, you can go through set-up wizard along the toolbar at the top to get things started. You can always return to the user interface to change your settings, so don’t be afraid to experiment and have some fun!
Watch Next: Send Photos by Email - CCFC Field Camera Tutorial


About the Author
 Raina Mithrush was the Marketing and Communications Consultant at Campbell Scientific Canada (CSC). She created marketing content for CSC and was particularly interested in online communications. Raina has a Bachelor of Commerce and a Diploma of Graphic Design and Communication. Outside of work, Raina enjoyed spending time outside with her puppy and family.
Comments
Please log in or register to comment.